
A silly small mix-up between “I” and “O” can cost you thousands of dollars and lots of aggravation between you and your client. Can you believe that? In today’s blog post, I explain the reasons behind it.
More often than not, I see mistakes at the installations that could easily be avoided at the measuring visit. By simply paying attention to details and understanding the basic differences between OB x IB x EB and product specifications, lots of frustration (and thousands of dollars) could be spared.
People in the industry use mounting options for two different things. It can be a bit confusing at first, so please pay attention.
Reference #1 (inside x outside)
Inside Mount
The first mounting option relates to the location where the product is going to be installed. When the treatment is being mounted between the window jamb, we consider it as an inside mount installation. Inside mount is commonly abbreviated by IB (also known as Inside Brackets) or as IM for (Inside Measurement).
When the treatment is not being mounted inside the window jamb, then it is mounted outside of the window opening, therefore we call it OB for outside bracket or OM for outside mount. Don’t confuse outside mount with outdoor mounting.
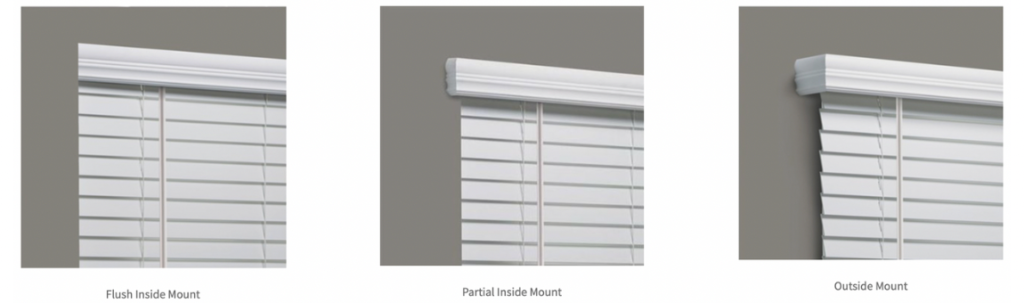
Additionally, when we are talking about inside mount installation, there are two options:
Fully recessed. This is where the product fits neatly within the window depth without it protruding into the room. Each product type has a different depth specification so make sure to get familiarized with the specs of the brand you are measuring for. This is extremely important!!
Sometimes, The depth of the window opening may be sufficient to install the mounting brackets as an Inside Mount, but NOT quite enough to mount it such that the headrail is fully inside the window opening.
When that happens, we call it partially recessed. When there is enough depth to install the brackets but not enough depth to fully recess the product into the window.
This is huge because some products are designed with valances that require side returns such as vertical blinds, wood and faux wood blinds, and panel tracks amongst others. Knowing the exact depth your window has will allow you to order the correct projection for the returns.
Another vital difference between INSIDE and OUTSIDE mounting openings is that when you order INSIDE mount products, the manufacturer will take a deduction on the width of the product when it goes into production. The reason for this is to ensure the product will operate freely without getting jammed in the opening.
For that reason, we measure the window opening in 3 spots: top, center, and bottom, and take the narrowest dimension for INSIDE mount installations.
Outside mount
For OUTSIDE mount products, manufacturers don’t take any deductions and they typically recommend ordering products using the widest width and longest height of the openings.
The second mounting reference is related to how the installation brackets are going to be secured.
Reference #2 (bracket installation)
There are three options for bracket installation:
Ceiling mount: as you guessed, these are mounted on the ceiling. Either the ceiling of the room or the ceiling of the window.
Face or wall mount: This means that the brackets are going to be fastened to the face of your surface (window frame or wall).
End mount: not as common, but you will come across situations where your window won’t have a ceiling nor a face to mount your brackets to. So the only option will be securing brackets from the ends. Arch and specialty windows are great examples where this application occurs.
You also have to keep in mind that not every product will be ideal for end mount applications. Especially the ones that usually require multiple brackets.
As you can see, attention to detail is the name of the game for the ones that want to become Top-Notch Installers!